Documentation Index
Fetch the complete documentation index at: https://trunk-4cab4936-sam-gutentag-batching-pfd.mintlify.app/llms.txt
Use this file to discover all available pages before exploring further.
What it is
Batching allows Trunk Merge Queue to test multiple pull requests together as a single unit, rather than testing them one at a time. When batching is enabled, Trunk intelligently groups compatible PRs and runs your test suite once for the entire batch. If the batch passes, all PRs in the batch merge together, dramatically reducing total test time.Why use it
- Reduce total test time by 60-80% - Instead of running your full test suite 10 times for 10 PRs, you run it 2-3 times for the same PRs grouped into batches. More PRs merged with less CI time.
- Increase merge throughput - Process 3-5x more PRs per hour compared to testing individually. A queue that handled 20 PRs/hour can now handle 60-100 PRs/hour with batching.
- Lower CI costs - Fewer test runs means lower CI/CD infrastructure costs. Teams report 50-70% reduction in CI minutes consumed by merge queue testing.
- Faster time-to-production - PRs spend less time waiting in queue. What used to take hours can now take minutes, getting features and fixes to production faster.
How to enable
Batching is disabled by default and must be explicitly enabled.
Configuration options
With Batching enabled, you can configure two options:- Maximum wait time - The maximum amount of time the Merge Queue should wait to fill the target batch size before beginning testing. A higher maximum wait time will cause the Time-In-Queue metric to increase but have the net effect of reducing CI costs per pull request.
- Target batch size - The largest number of entries in the queue that will be tested in a single batch. A larger target batch size will help reduce CI cost per pull request but require more work to be performed when progressive failures necessitate bisection.
A good place to start is with the defaults, Maximum wait time set to 5 (minutes) and Target batch size set to 4 (PRs).
Excluding PRs from Batching
Sometimes you need a specific PR to test in isolation, even when batching is enabled for your queue. You can prevent individual PRs from batching without changing your overall batching configuration.When to use this
- High-risk changes — Infrastructure updates, database migrations, or changes that could affect other PRs in unpredictable ways
- Debugging batch failures — Isolate a suspected problematic PR to confirm it tests correctly on its own
- Critical hotfixes — Make sure a time-sensitive fix isn’t delayed or affected by other PRs in a batch
- Flaky PR isolation — Test a PR with known flaky behavior separately to avoid impacting other PRs
How to exclude a PR from batching
Option 1: Using the/trunk merge command
Add the --no-batch flag when submitting your PR:
noBatch: true when calling the /submitPullRequest endpoint:
How it works
When a PR is submitted with no-batch:- Queue position is unchanged — The PR maintains its position in the queue based on when it was submitted
- No restarts triggered — Submitting a no-batch PR doesn’t restart testing for other PRs already in the queue
- Tests in isolation — The PR is guaranteed to test by itself, not grouped with other PRs
- Other PRs unaffected — Batching continues normally for all other PRs in the queue
Excluding a PR from batching only affects that specific PR. Your queue’s batching settings and other PRs remain unaffected.
Bisection Testing Concurrency
When a batch fails, Trunk automatically splits it apart (bisects) to identify which PR caused the failure. You can configure a separate, higher concurrency limit specifically for these bisection tests to isolate failures faster without impacting your main queue.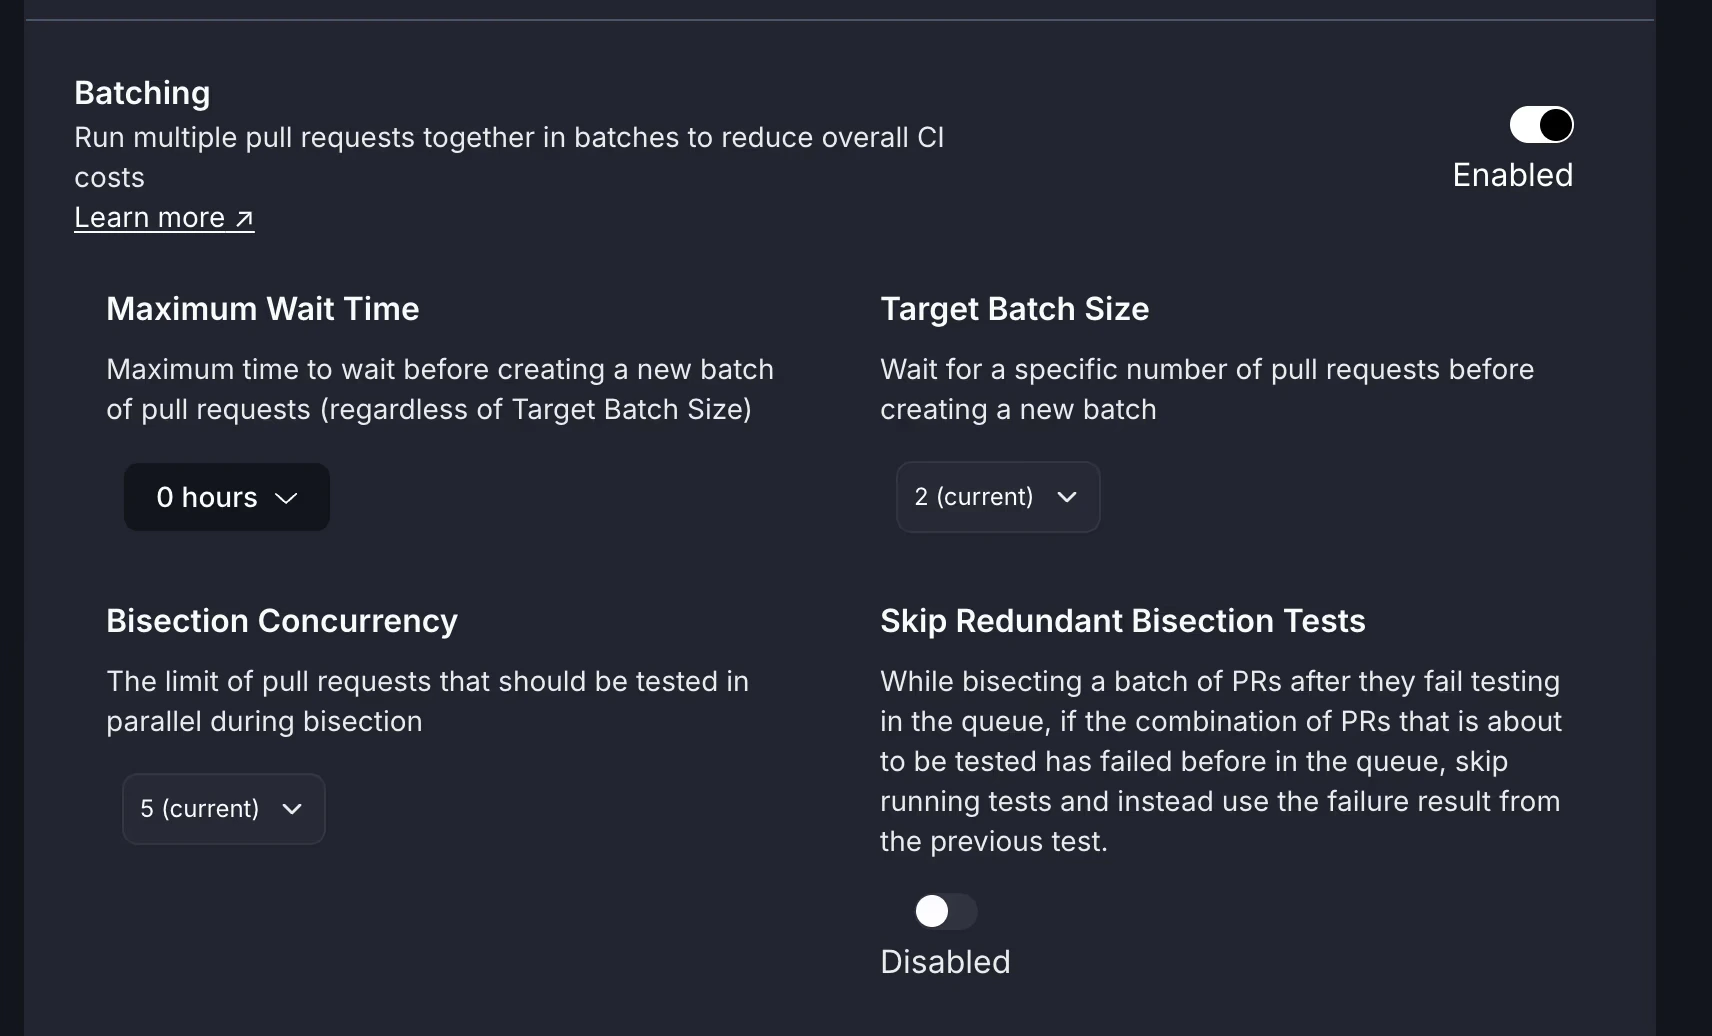
Why Separate Bisection Concurrency?
By default, bisection tests use the same concurrency limit as your main queue. This means:- Bisection can slow down other PRs waiting to merge
- Developers wait longer to learn which PR broke the batch
- Your main queue’s throughput decreases during failure investigation
- Speed up failure isolation - Run bisection tests at higher concurrency to identify problems faster
- Maintain queue throughput - Keep your main queue running at optimal capacity during bisection
- Optimize each workflow independently - Be aggressive about isolating failures without impacting successful PR flow
How It Works
When you set a higher bisection concurrency:- Main queue concurrency controls how many PRs test simultaneously in the normal queue
- Bisection concurrency controls how many PRs test simultaneously during failure isolation
- Both run independently - bisection tests don’t count against your main queue limit
Example scenario:
Example scenario:
- Main queue concurrency: 5
- Bisection concurrency: 15
- Batch
ABCDfails and needs to be split
Configuring Bisection Concurrency
Navigate to Settings > Repositories > your repository > Merge Queue > Batching:- Enable Batching (if not already enabled)
- Find the Bisection Testing Concurrency setting
- Set a value higher than your main Testing Concurrency for faster failure isolation
- Monitor your CI resource usage and adjust as needed
Recommended Settings
- Conservative approach
- Balanced approach
- Aggressive approach
- Main queue concurrency: 5
- Bisection concurrency: 10
- Good for: Teams managing CI costs carefully
When to Use Higher Bisection Concurrency
Consider increasing bisection concurrency if:- Developers frequently wait for bisection results to know what to fix
- Your CI system has spare capacity during failure investigation
- Large batches fail and take a long time to isolate the culprit
- Fast feedback on failures is critical to your workflow
Monitoring and Optimization
Track these metrics to optimize your bisection concurrency:- Time to isolate failures - How long it takes to identify which PR broke a batch
- CI resource usage during bisection - Are you maxing out your runners?
- Developer wait time - How long developers wait for failure feedback
- Main queue throughput during bisection - Is bisection slowing down other PRs?
Start with bisection concurrency 2x your main queue concurrency, monitor the impact, and adjust based on your team’s priorities and CI capacity.
Best Practices
✅ Set bisection concurrency higher than main queue - This is the whole point of the feature ✅ Monitor CI costs - Higher bisection concurrency means more runners during failures ✅ Start conservative - Begin with 2x main concurrency and increase gradually ✅ Combine with other optimizations - Works best alongside Pending Failure Depth and Anti-flake Protection ❌ Don’t set too high - Extremely high bisection concurrency can overwhelm CI systems ❌ Don’t set lower than main queue - This defeats the purpose and slows down bisectionTest Caching During Bisection
When a batch fails and Trunk splits it apart to identify the failing PR, the merge queue intelligently reuses test results it has already collected during the bisection process. This avoids redundant CI runs and speeds up failure isolation.How It Works
During bisection, Trunk maintains a cache of test results as it progressively splits the failed batch. If the queue knows with certainty that a particular combination of PRs will fail (because it already tested that exact combination earlier in the bisection process), it skips running the test again and reuses the previous result.Example bisection with test caching
Example bisection with test caching
- Batch
ABCDfails testing (main ← ABCD) - Trunk splits the batch:
ABandCD - Tests
AB(passes) andCD(fails) - Now Trunk needs to split
CDfurther:CandD - Before testing, Trunk checks: “Have I already tested
CorDindividually?” - If
main ← ABCDfailed andmain ← ABpassed, Trunk knowsCDcontains the failure - When testing
main ← AB ← C, if this combination was already tested earlier, reuse that result - Skip redundant CI runs and identify the failing PR faster
Benefits
Faster failure isolation: Skip tests you’ve already run during bisection, reducing time to identify the culprit PR Significant CI cost savings: Especially important for large batches or expensive test suites where redundant tests would waste substantial resources Quicker developer feedback: Developers learn which PR broke the batch sooner, allowing them to fix issues faster Automatic optimization: No configuration required - the merge queue automatically detects and reuses applicable test resultsWhen Test Caching Applies
Test caching only applies during the bisection process when:- Batching is enabled - This is a batching-specific optimization
- A batch has failed and is being split to identify the failure
- The merge queue has already tested a specific combination of PRs during the current bisection
- The test result is definitive - The queue has high confidence the result would be the same
- Initial batch testing (before any failures)
- PRs in the main queue that aren’t undergoing bisection
- Tests that haven’t been run yet in the current bisection process
Example Scenario
Without test caching:- Batch
ABCDEF(6 PRs) fails - First bisection: Test
ABCandDEF(2 CI runs) DEFfails, need to split further- Second bisection: Test
DEandF(2 CI runs) DEfails, need to split further- Third bisection: Test
DandE(2 CI runs) - Total: 6 CI runs to isolate the failure
- Batch
ABCDEFfails - we knowABCDEFcombination fails - First bisection: Test
ABC(passes) and identifyDEFfails (no new test needed - we know from original batch) - Second bisection: Test
DE- if we’ve already tested this combination, reuse result - Third bisection: Test
DorE- reuse any already-known results - Total: 2-4 CI runs instead of 6
Best Practices
✅ Use with larger batch sizes - More PRs in a batch means more opportunities to cache results ✅ Combine with bisection concurrency - Fast bisection + test caching = maximum efficiency ✅ Enable batching - This feature only works when batching is enabled ✅ Monitor your metrics - Track CI spend and bisection time to see the impact ❌ Don’t try to configure it - Test caching is automatic and always enabled when batching ❌ Don’t rely on it for flaky tests - Caching assumes consistent test behavior; flaky tests may bypass caching for safetyHow This Works with Other Features
Test caching complements other batching optimizations:- Bisection Testing Concurrency - Run bisection tests faster AND skip redundant ones
- Pending Failure Depth - Keep more PRs in queue during failure recovery
- Optimistic Merging - Merge successful batches while bisection runs in background
Note: Test caching for batch failure isolation is automatically enabled for all repositories using batching mode. No configuration is required.
Fine tuning batch sizes
Signs your batch size is too large:- Batches frequently fail and need to be split
- Long wait times to form full batches
- Test suite times out or becomes unstable
- Not seeing significant throughput improvement
- Batches form immediately (could handle more PRs)
- Still consuming lots of CI resources
- Test suite speed (faster tests = larger batches)
- Test stability (more flaky tests = smaller batches)
- PR submission rate (more PRs = larger batches)
Tradeoffs and considerations
The downsides here are very limited. Since batching combines multiple pull requests into one, you essentially give up the proof that every pull request in complete isolation can safely be merged into your protected branch. In the unlikely case that you have to revert a change from your protected branch or do a rollback, you will need to retest that revert or submit it to the queue to make sure nothing has broken. In practice, this re-testing is required in almost any case, regardless of how it was originally merged, and the downsides are fairly limited.Common misconceptions
- Misconception: “Batching merges multiple PRs into a single commit”
- Reality: No! Each PR is still merged as a separate commit. Batching only affects testing, not merging.
- Misconception: “If a batch fails, all PRs in the batch fail”
- Reality: Trunk automatically splits the batch and retests to identify only the failing PR(s). Passing PRs still merge.
- Misconception: “Batching always makes the queue faster”
- Reality: Batching is most effective with stable tests and high PR volume. For low-traffic repos or flaky tests, the overhead may outweigh benefits.
Related features
Batching works exceptionally well with these optimizations: Predictive testing - Batching builds on predictive testing. Batches are tested against the projected future state of main, just like individual PRs. These features complement each other perfectly. Optimistic merging - While a batch is testing, the next batch can begin forming and testing optimistically. Combining batching with optimistic merging provides maximum throughput. Configure both for best results. Pending failure depth - When a batch fails, pending failure depth controls how many successor test runs the system waits on before transitioning the failed batch. Combined with optimistic merging, this can prevent premature bisection of a batch that only failed due to a transient issue. Anti-flake protection - Essential companion to batching. Reduces false batch failures caused by flaky tests, making batching more reliable and efficient.How batching interacts with parallel queues and PFD
Batching, parallel queues, pending failure depth, and optimistic merging each shape the queue independently — but they also interact in ways that are easy to miss when reading each page in isolation. This section covers the cross-feature behaviors customers most often ask about.Batching is another form of lane
It’s tempting to think of batching as something that happens within a parallel-queue lane. It’s clearer to think of a batch as itself another form of lane: a temporary testing-lane shape that groups PRs together for a single test run. Parallel queues split the queue into lanes based on impacted targets. Batching groups PRs into a single test unit. Both produce a “thing the queue tests as one.” The two are orthogonal — you can run batching inside a parallel-queue setup, and the graph view shows the resulting lane shapes.Use the merge queue graph view to see how batches and parallel-queue lanes overlap for your queue’s current state.
PR batch eligibility
Trunk groups PRs into a batch based on:- FIFO order — PRs are considered for batching in the order they were submitted to the queue.
- Target overlap — In parallel mode, PRs only batch together if they share enough impacted-target overlap to belong to the same lane. PRs with disjoint target sets stay in separate lanes and don’t batch with each other.
- Maximum wait time and target batch size — A batch forms when either the target batch size fills, or the maximum wait time elapses with at least one PR present.
--no-batchflag — PRs submitted with--no-batch(ornoBatch: truevia API) test in isolation, regardless of the batching configuration.
The ALL keyword does not serialize downstream PRs
A PR that impacts ALL targets blocks downstream PRs that share any target with it. But “blocks” doesn’t mean “serializes” — downstream PRs without shared targets can continue testing in parallel behind the ALL-impacting PR, up to your testing concurrency. Concretely: if PR-A impacts ALL targets and PR-B impacts onlydocs, PR-B can still test in parallel behind PR-A. If PR-A fails, PR-B’s test result is unaffected — they were never sharing a lane.
ALL is a correctness signal for impact, not a serialization directive. Concurrency, target overlap, and FIFO order still govern what tests in parallel.
Transitive dependents are usually captured by impacted targets
A common worry: “PR-1 changes target X, PR-2 introduces a feature that depends on X’s old behavior. Will they merge in parallel and break main?” If the two PRs share zero impacted targets, the queue treats them as parallel-safe. In practice this is rare: most impact-detection tools (Bazel, Nx, and similar) include transitive dependents when computing impacted targets. PR-2 would typically list target X as well, putting them in the same lane. If your impact-detection setup misses transitive dependents, you’ll see false-parallel merges. That’s a signal to widen your impact graph, not to disable parallel mode.Bisection splits in half, not one-by-one
When a batch fails and the queue needs to find the culprit, it splits the batch in half rather than peeling off individual PRs. A batch of 5 doesn’t bisect into 5 isolated tests. It bisects into 2 sub-batches, retests, and recurses on whichever sub-batch failed. Your Bisection Testing Concurrency is the concurrency limit for those sub-batch test runs — not the number of individual PRs being retested at once. This matters when you size bisection concurrency: setting it equal to your batch size is more than you need. The bisection process is logarithmic in batch size.PFD’s downstream-PR delay
Pending failure depth waits for predecessor groups to finish (always) and successor groups to finish (up to the configured depth). One consequence customers hit:Example. PFD is set to 1. PR-A fails. PR-B is testing behind it. A new PR-C arrives that shares impacted targets with PR-A. The queue will wait for PR-C to finish testing before it transitions PR-A out of Pending Failure — even though PR-C wasn’t in the queue when PR-A failed.This is by design. PFD’s correctness signal depends on observing how successor PRs that include the failed group’s changes behave. A newly-arrived overlapping PR is a valid successor test — its result is informative about whether PR-A’s failure was a flake or a real failure. Waiting for it produces a stronger signal. The trade-off: high PFD values combined with frequent new submissions can extend the time before a known-failed PR is kicked from the queue.
If you need an upper bound on how many successor conclusions (not just queue positions) PFD waits on, that’s an active area of design — share your use case with support.
Disabling optimistic merge causes batch-removal restarts
Optimistic merging lets downstream batches keep testing against a projected future state of main while an upstream batch is still being resolved. If you disable optimistic merging, the queue can no longer reuse those downstream test results when the upstream batch changes shape. So if a batch ahead of yours is removed (for example, because it failed bisection and one PR was kicked), your batch may need to re-test from scratch — even if it had already passed. Customers who disabled optimistic merging have reported PRs going from “ready to merge” back to “testing” specifically because of this restart behavior.If you’re seeing unexplained re-tests of already-passing batches, check whether optimistic merging is disabled.
MQ-only failures aren’t yet flakiness signals
A test that fails in the merge queue but passes on main isn’t currently fed into Trunk Flaky Tests as a flakiness signal. Similarly, bisection test runs aren’t surfaced as flakiness data today. In practice, the queue’s anti-flake protection (optimistic merging + PFD) catches a lot of these transient failures without needing a separate flakiness signal. But if you’re trying to understand why an MQ-only flake doesn’t show up in your flaky-test dashboard, that’s why.Event-side view
For the webhook lifecycle of these batch events — including thepending_failure event that fires when a batch enters the hold state — see the webhooks reference.
Batching + Optimistic Merging and Pending Failure Depth
Enabling batching along with Pending Failure Depth and Optimistic Merging can help you realize the major cost savings of batching while still reaping the anti-flake protection of optimistic merging and pending failure depth.| event | queue |
|---|---|
| Enqueue A, B, C, D, E, F, G | main <- ABC <- DEF +abc |
| Batch ABC fails | main <- ABC |
| pending failure depth keeps ABC from being evicted while DEF | main <- ABC (hold) <- DEF+abc |
| DEF passes | main <- ABC <- DEF+abc |
| optimistic merging allows ABC and DEF to merge | merge ABC, DEF |
Next steps
Start with batching:- Enable batching with conservative settings (batch size: 3-5)
- Monitor for a few days and observe behavior
- Gradually increase batch size as you gain confidence
- Check Metrics and monitoring to measure impact
- Optimistic merging - Combine with batching for maximum throughput
- Anti-flake protection - Reduce false batch failures
- Pending failure depth - Tune behavior during batch failures
- Metrics and monitoring - Track throughput improvements and CI cost savings
- Watch batch failure rate (should be <10%)
- Measure time-to-merge improvements
- If batches fail frequently → Lower batch size or enable Anti-flake protection
- If not seeing improvements → Check PR volume and test stability
- For detailed help → Troubleshooting